Full-disk encryption: turn on BitLocker, FileVault or LUKS
Full-disk encryption scrambles everything on your laptop's drive so that a thief who pulls out the drive, or boots the machine from a USB stick, sees noise instead of your files. Windows, macOS and Linux all have it built in.
Full-disk encryption: turn on BitLocker, FileVault or LUKS
Full-disk encryption scrambles everything on your laptop’s drive so that a thief who pulls out the drive, or boots the machine from a USB stick, sees noise instead of your files. Windows, macOS and Linux all have it built in.
Who this guide is for
Anyone with a laptop or desktop who has never checked whether the drive is encrypted. It is the single most useful step if the laptop is ever lost or stolen, and it costs almost nothing in daily use.
What this guide does not solve
- A running, unlocked laptop. Once you are logged in, the drive is readable by you and by any malware running as you. Encryption protects a machine that is off or locked out, not one being used.
- Files you send or sync elsewhere. Cloud storage, email and backups have their own protection; see the backup guide.
- Encrypted containers and USB sticks that work on every system. That is what VeraCrypt is for.
- Phones. Modern iPhones and Android phones encrypt by default once a screen lock is set; see the healthcare profile for how to check.
What you gain, and what it costs
Gain: a lost or stolen laptop does not hand over your documents, saved logins, photos and browser history.
Cost:
- A lost key means lost data. This is the real tradeoff. Apple states it plainly: if you forget your login password and your recovery key, “your files and settings will be lost forever”. Microsoft says its support “doesn’t have the ability to retrieve, provide, or recreate a lost BitLocker recovery key.”
- Recovery prompts. Changing hardware or firmware settings can make Windows ask for the recovery key at startup. You want to know where it is before that happens.
- Backups matter more. A damaged drive or encryption header can make data unreadable, so encryption does not replace a backup.
When this is overkill
It is almost never overkill on a laptop. The part that can be overkill is the extra hardening below (a startup PIN, hibernating instead of sleeping). Skip that unless someone with real skill and time is likely to have your laptop.
The practical default
Turn on the built-in encryption for your system, save the recovery key somewhere that is not the laptop, and stop there.
Windows: Device Encryption or BitLocker
Windows has two names for related features:
- Device Encryption is the simple version. Microsoft says it is available on all Windows versions, including Home, on devices that meet its requirements (a TPM and Secure Boot; since Windows 11 24H2 the older Modern Standby/HSTI and DMA-port prerequisites are gone, so more devices qualify). It only encrypts the system drive and fixed drives, not USB drives.
- BitLocker Drive Encryption is for advanced use and lets you encrypt drives manually. It is available on Windows Pro, Enterprise and Education, not on Home.
The local-account catch. On a device that is not joined to a work or school domain, Microsoft says protection switches on only after an administrator signs in with a Microsoft account, which also uploads the recovery key to that account. Microsoft’s words for a device that uses only local accounts: it “remains unprotected even though the data is encrypted”, meaning the drive is encrypted but the key sits readable on the machine, so it protects nothing. Microsoft’s help adds that with a local account Device Encryption “isn’t turned on automatically”. So with only a local account: on Windows Home, Device Encryption protects you only once an administrator signs in with a Microsoft account; on Pro, use BitLocker (below) and keep the key yourself.
Already encrypted? Check first. Many laptops arrive with Device Encryption on. Open Settings → Privacy & security → Device encryption (you need an administrator account; if the item is missing, Device Encryption is unavailable on your device or you are signed in as a standard user). If it is on, check that you can find the key: from another device, go to aka.ms/myrecoverykey and sign in with your Microsoft account. If someone else set up the laptop, Microsoft notes the key may be in that person’s account. On Pro, Manage BitLocker (see below) also shows each drive’s state.
Turn on Device Encryption (Home and Pro). Sign in with an administrator account, go to Settings → Privacy & security → Device encryption and switch the toggle On. Not there? Press Start, type System Information, right-click it and choose Run as administrator, then look for “Automatic Device Encryption Support” or “Device Encryption Support”: “Meets prerequisites” means it is available; otherwise the value names the cause (no usable TPM, Windows Recovery Environment not configured, Secure Boot off). If you turn Device Encryption off, Microsoft notes it will not turn itself on again, so you must re-enable it manually.
Turn on BitLocker (Pro, Enterprise, Education). Sign in with an administrator account, press Start, type BitLocker and choose Manage BitLocker. Next to the operating system drive choose Turn on BitLocker, then pick an unlock option and back up the recovery key (the options are below) before encryption starts. Encryption then runs in the background; you can keep using the laptop. If Manage BitLocker is not listed, Microsoft says your Windows edition does not have it.
Recovery prompts. Windows asks for the recovery key when it detects a possible unauthorized access attempt, and also after changes to hardware, firmware or software that it cannot tell apart from an attack. So know where the key is before you update firmware or change hardware.
Recovery key. With Device Encryption the key goes to your Microsoft account automatically; check it at aka.ms/myrecoverykey as above. With BitLocker, or to make an extra copy on Pro: Manage BitLocker → Back up your recovery key next to the drive, then choose Save to your Microsoft account, Save to a USB flash drive, Save to a file or Print the recovery key, and Finish. The file cannot go on the encrypted drive itself. Microsoft warns for both the USB drive and the printout: don’t keep them with the computer, because a thief who gets both could bypass the encryption.
Tradeoff to know: a key stored in your Microsoft account is convenient, and it also means that account is part of your security. Protect it with a strong password and two-factor authentication. If you would rather not have the key with Microsoft, use BitLocker on Pro and store the key yourself, and accept that losing it is on you.
macOS: FileVault
On a Mac with Apple silicon or an Apple T2 chip, Apple says your data is encrypted automatically. FileVault adds the requirement to enter your login password before anyone can decrypt it, so switch it on anyway.
Turn it on (administrator needed):
- Apple menu → System Settings → Privacy & Security in the sidebar → FileVault (you may need to scroll down). If FileVault is already on, check that you still know where your recovery key is, or that your iCloud account can unlock the disk.
- Turn on FileVault, and enter your password if asked.
- Choose how to unlock the disk if you forget your password: Allow my iCloud account to unlock my disk (or Set up my iCloud account to reset my password if you don’t use iCloud yet), or Create a recovery key and do not use my iCloud account. If you pick the recovery key, write it down exactly before you go on.
- Continue. Other users on the Mac may need Enable Users and their login password before they can unlock the disk.
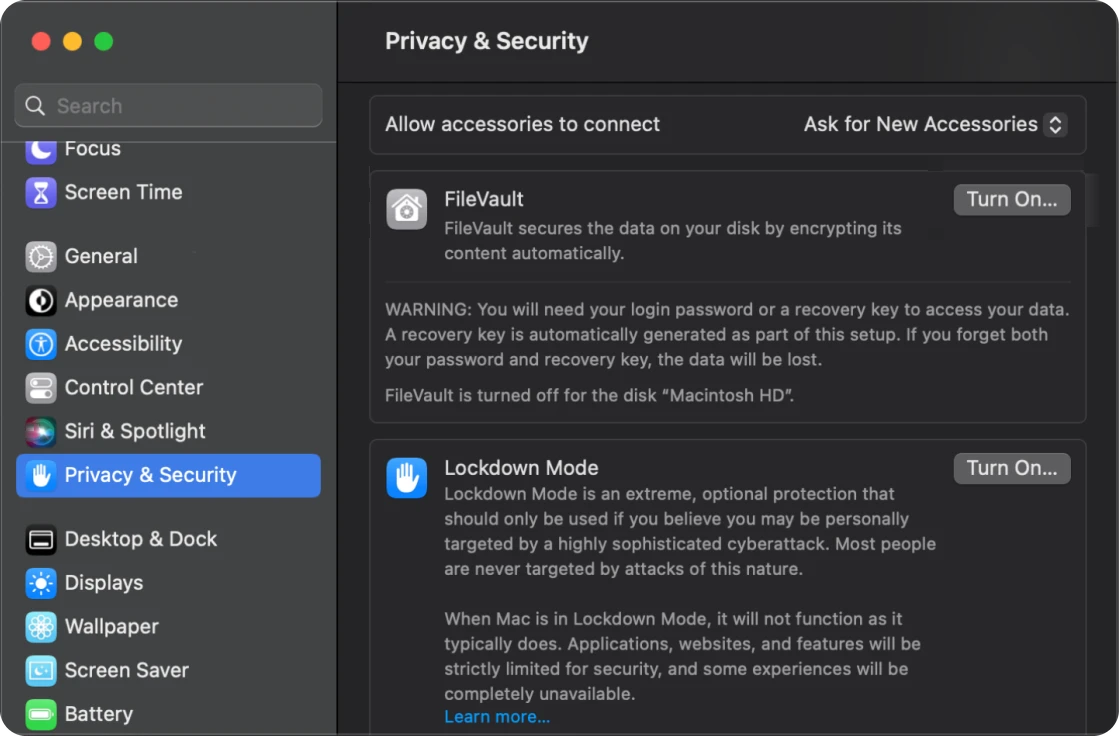
FileVault in macOS System Settings (dark mode). Screenshot: Appuals (appuals.com), annotations removed.
Recovery: Apple offers two options. Your iCloud account is convenient, with no separate key to track. Or a recovery key, which Apple says to keep “somewhere other than your encrypted startup disk”, and not in the same physical location as your Mac. Same tradeoff as above: iCloud recovery makes your Apple account part of your security.
Linux: LUKS
Linux uses LUKS. The easiest time to turn it on is at install:
- Ubuntu Desktop (26.04): on the Disk setup screen choose Erase disk and install Ubuntu. On the next screen, Encryption and file system, choose Encrypt with a passphrase, which Ubuntu describes as LVM with disk encryption and “the recommended option to encrypt your data”; the installer says it uses LVM with LUKS encryption. The installer then asks you to create the passphrase you will type at every startup. Under Advanced options there is also a ZFS variant, marked Experimental in the installer. The third choice, Use hardware-backed encryption, unlocks with the TPM at startup and only works on recent PCs. That one shows a recovery key at the end, and Ubuntu warns that “if you lose your recovery key, you might lose access to your data in certain scenarios”. It also warns that without an encryption passphrase “your data is only as safe as the weakest of the user passwords”. For most readers the passphrase option is the simpler, better-understood choice.
- Fedora (45): on the Installation method step choose Use entire disk; on the next step, Storage configuration, tick Encrypt my data and enter the passphrase twice (Passphrase, Confirm passphrase). The same step lets you pick the keyboard layout used to type the passphrase at boot. The option only appears when the installer creates new partitions: it says it “only applies to new partitions”. These are the screens of the web installer, which Workstation, KDE, the spins and (since Fedora 45) the Atomic desktops such as Silverblue use; Fedora Server and the Everything image still have the older installer.
Already installed without encryption? Converting in place is risky and distro-specific. The realistic route is to back up, reinstall with encryption on, and restore. In Fedora’s installer, choose a fresh install such as Use entire disk: Reinstall Fedora keeps the old partitions and skips the encryption screen.
Passphrase and header. Pick a long passphrase you can remember, because there is no recovery service. The LUKS project’s FAQ warns that damage to the LUKS header can make decrypting “impossible”; its example (an accidental format) is about the older LUKS1 format, while the LUKS2 format current installers use keeps a second copy of the header. A header backup is still cheap insurance: sudo cryptsetup luksHeaderBackup <device> --header-backup-file <file>; it only needs updating when you change passphrases. There is no graphical tool for this step. Store that file off the laptop and as carefully as the key: the cryptsetup manual notes that the backup plus a passphrase that was valid at the time still opens the drive, even after you change that passphrase.
Check that it is encrypted. In Disks (GNOME Disks, on Ubuntu and Fedora Workstation) select the drive and then the large partition: Contents shows “LUKS Encryption (version 2) — Unlocked” for an encrypted partition. In KDE Partition Manager the file system shows “[Encrypted]” after its name. In a terminal, lsblk -f shows crypto_LUKS in the FSTYPE column.
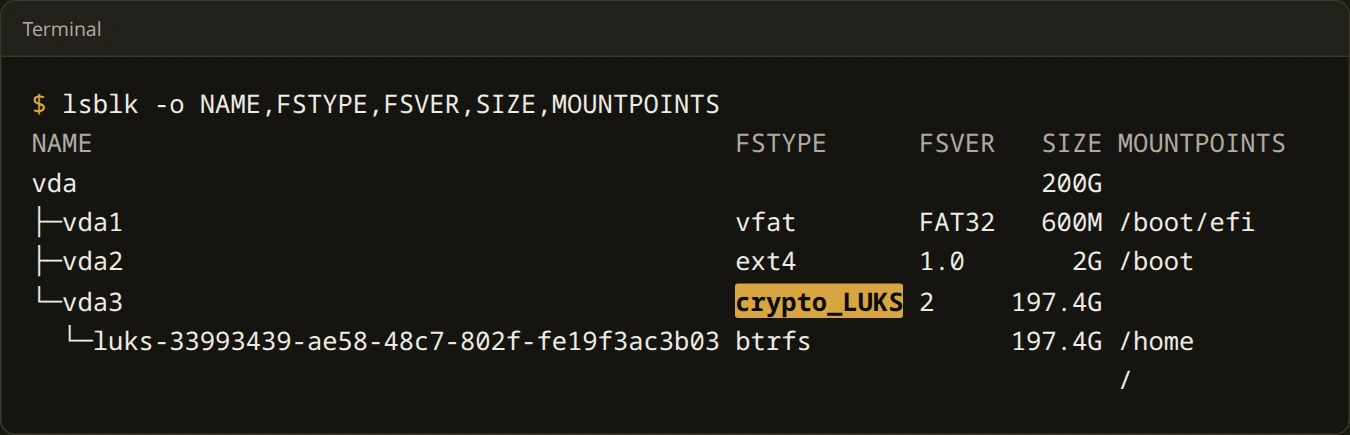
Output of lsblk -o NAME,FSTYPE,FSVER,SIZE,MOUNTPOINTS on a Fedora system: the root and home volumes sit inside a crypto_LUKS (version 2) partition. lsblk -f shows the same, with a UUID column. Screenshot: PrivacyGear, September 2026.
Stronger setup, only if it fits
Microsoft’s own documentation splits the threat in two:
- Opportunistic thief (no special skill or hardware): the default TPM-only setting is, in Microsoft’s words, the mitigation. It is also the most convenient, since you do not type anything extra at startup.
- Skilled attacker with lengthy physical access: Microsoft recommends a TPM with a PIN, plus disabling standby (sleep) and shutting down or hibernating before the device leaves your control. These settings are not configured by default. Microsoft says TPM-only is “less secure” than options with an extra factor.
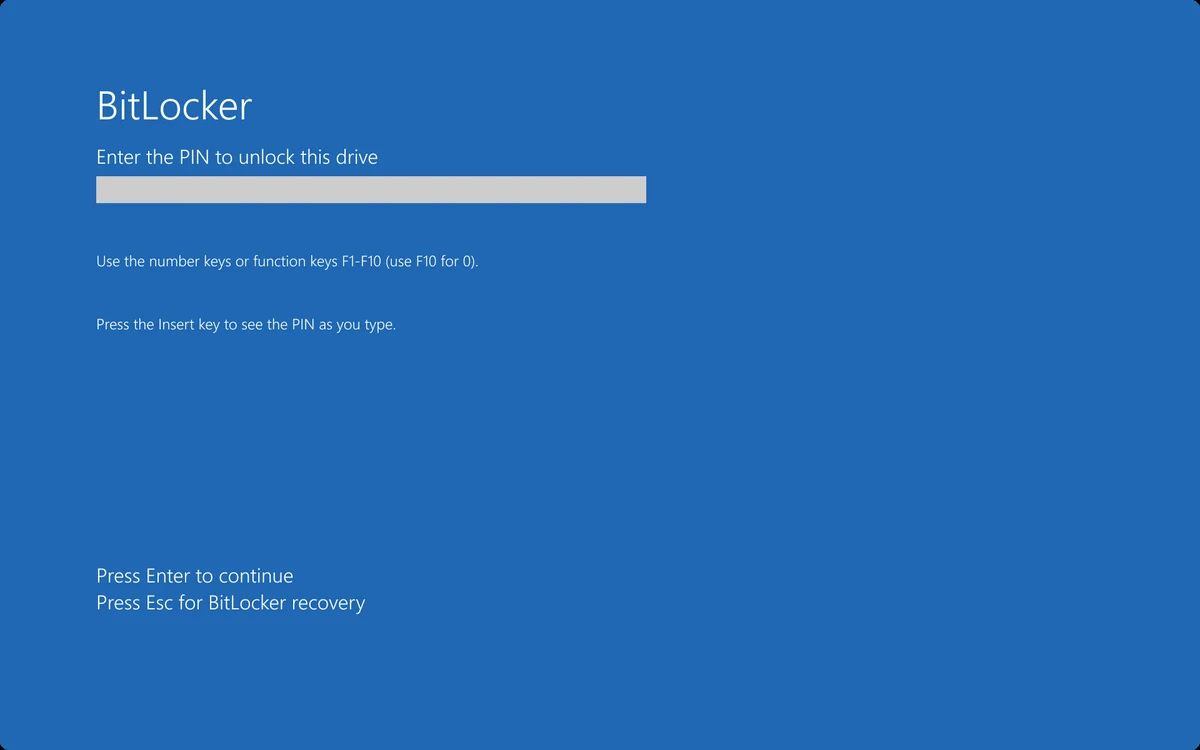
The BitLocker startup PIN screen that appears when TPM with PIN is set. Image: Microsoft Learn.
Why sleep matters: when a device sleeps, the keys stay in memory and you are not asked for a PIN when it wakes. Hibernation locks the drive, but with TPM-only it unlocks again without a PIN, so it only adds protection together with a startup PIN. For most readers: shut down, rather than close the lid, when you leave the laptop somewhere you don’t trust.
The friction is real: a startup PIN is one more thing to type and to forget, and forgetting it means using the recovery key. Choose it only if your threat model justifies it (see the secure laptop guide).
Stopping point
You are done when:
- The drive is encrypted (Device Encryption or BitLocker on, FileVault on, or LUKS on).
- The recovery key or passphrase is stored somewhere that is not this laptop, and you have confirmed you can find it.
- You have a working backup.
Next step
Protect the rest of your setup
- Secure laptop: hardware, OS and settings explained
- Backups that actually work
- VeraCrypt encrypted storage
Cover and logo panel: Windows, Apple and Linux marks via Wikimedia Commons (Windows and Apple logos public domain; Tux by Larry Ewing, Simon Budig and Garrett LeSage, attribution licence); logos are trademarks of their owners.
Sources: Microsoft Support (BitLocker overview, Device Encryption, BitLocker Drive Encryption, back up and find your recovery key), Microsoft Learn (BitLocker overview, BitLocker countermeasures), Apple Mac User Guide for macOS 27 (FileVault), Ubuntu Desktop documentation and the Ubuntu 26.04 installer strings, the Fedora 45 installer (Anaconda web UI) strings and release notes, GNOME Disks and udisks strings, cryptsetup manual and FAQ. Steps checked 2026-10-29 (Fedora: 2026-11-04).